Creating and managing mandates

Document ID: 43590
Modified: 16/09/2022

Body:

What if your SEPA direct debit was refused?

If you wish to know why your bank has rejected a SEPA direct debit, please subscribe to the module 'Exporting account info' and ask your bank to send CODA for the concerning account. In the received CODA will be a code which will describe why a SEPA direct debit has been rejected (insufficient funds, closed account, ...). For more info on the specific rejection codes, use the following link.

Requirements for starting with SEPA direct debit and mandates
  • The user creating the SEPA direct debits must be subscribed to the module Direct Debits
  • There must be at least one user that is allowed to create Direct Debits and one user that is allowed to sign them (this can be the same user). If you do not have these permissions you can send a request to your bank. Use this link to get the correct bank contact.
  • A Creditor identifier which is used to identify you as creditor to your bank. This can only be obtained from your bank. For example: the creditor identifier from Isabel is BE55ZZZ0455530509.
    Belgian creditor identifiers have the following structure:
    • BE: Country code
    • 55: Control number
    • ZZZ: Company number
    • 0455530509: National identification
  • The mandate information:
    • Mandate references
      The mandate reference is something you choose, but it has to be something unique that both you (the creditor) and your customer (the debtor) can identify. For example: Isabel uses the combination of the date the mandate has been signed and the unique customer ID (YYMMDDcustomerID).
    • Debtors IBAN and BIC: this must be a bank connected to Swift. The validation of these informations is performed by Isabel.
    • Debtors name and address: as of November 19 2017, the debtor address is mandatory when the bank of the debtor or creditor account is located in a non-EEA SEPA country or territory. This applies to all new SEPA Direct Debits, and all new mandates added to SEPA Direct Debits.
Overview of Mandate management
How to access

To access Mandate management, go to the tab Transactions > Click in the left navigation panel on Mandates.

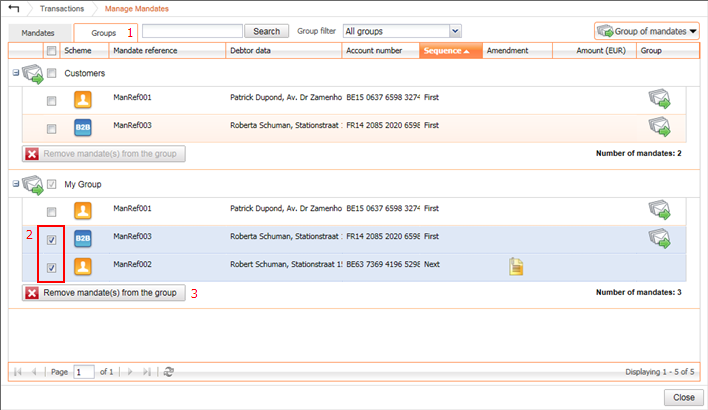
As a result the Manage Mandates window will be displayed.

Window overview

  • Use the tabs Mandates and Groups to switch between a single mandate and group view.
  • In Group filter you can select one of your created. This way only the mandates of that group will be displayed.
  • You can click on the arrow down button in any column to display the sorting and filter option. The Filter is only available in the column 'Scheme' and 'Sequence'.
  • In the column Group you can verify to which group(s) the corresponding mandate is assigned
  • Icon to display the scheme of the mandate:
    • Core mandate
    • B2B mandate
  • In the column Amendment an icon will be displayed if the mandate has an attached amendment.
Managing your mandates
Creating new mandate

In the ‘Manage Mandates’ window you have the option to create:

  • A New Mandate: You can insert/create (the) new mandates for SEPA direct debit. You can find the relevant information on the mandate forms that you have sent to new debtors. They have sent back these forms signed, with their IBAN and BIC.


Define mandate information

  • Mandate reference: The mandate reference is something you choose, but it has to be something unique that both you (the creditor) and your customer (the debtor) can identify. For example Isabel uses the combination of the date the mandate has been signed and the unique customer ID (DDMMYYUserID).
  • Payment scheme: choose between Core and B2B
    • If the mandate concerns an agreement with a private customer, the core scheme is mandatory. The debtor has at least 8 weeks from the execution date of the direct debit to request a refund.
    • If the mandate concerns an agreement with another company, both core and B2B are possible. When you choose B2B, the debtor's bank verifies the mandate, and the debtor can not claim a refund after validation.
      The debtor must explicitly confirm the direct debit mandate to his bank, preferably in advance, but at the latest on the day of the first collection. If this hasn't been done, the direct debit will be refused by his bank (no mandate).
  • Type of payment: choose between Recurrent or One-off
  • Sequence: is send to the bank notifying that a mandate is created or deleted. Therefore, it needs to be carefully managed by the creditor.
    • First (optional) : can optionally be used for the first collection of a mandate. (for example to easily recognize mandates that have not yet been successfully executed by the bank)
    • Next : can be used for the complete lifecycle of your mandate, except for the last collection.
    • Final: should only be used for the last collection of the mandate. When your SEPA direct debit is send to your bank it will provide the instructions to delete the mandate. If you re-use such a mandate your SEPA direct debit will be rejected due to "mandate expired".
  • Signature date: this is the date when the mandate has been signed. If it's a migrated mandate it should be the date when the original mandate was signed. This can be obtained in the migration file. If the date that the original mandate was created is not known, you can use the date that you migrate the DOM80 mandate to a SEPA mandate.
Define Debtor information

  • Name and address: the name and address of your debtor
  • Account country: the country of the debtors account (this country can be different from the debtors address)
  • Account number (IBAN): the IBAN of the debtor
  • BIC: the BIC of the debtors bank account
Define Creditor information

  • Creditor identifier: this is used to identify you as creditor to your bank (ex: the creditor identifier from Isabel is BE55ZZZ0455530509). If you already have existing mandates you can select your previously used creditor identifiers out of the list by clicking the arrow down button. See requirements for more information about the creditor identifier.
  • Name and address: enter the name and the address corresponding to your creditor identifier. This information is automatically filled in if you have selected a creditor identifier from the list.
Define mandates defaults and a personal note

  • Default amount: enter a default amount for your mandate. During the creation of your SEPA direct debit you can also specify another amount.
  • Default message to debtor: enter a default message for your mandate. During the creation of your SEPA direct debit you can also specify another message to your debtor.
  • Note: This message can also be used as a personal note for the mandate (ex. when adding Amendments you can enter the changed data in the note)
Managing your groups
Assigning mandates to groups

  1. Select in ‘Manage mandates’ the mandate(s) you would like to group, using the checkbox in the first column.
  2. Click on the Group of mandates button. As a result the Group of mandates pop-up window appears underneath the button.
    Here you can create a new group or assign mandates to existing groups.

    1. To create a new group, you type the name of your new group.
    2. Click on Create group. As a result the newly created group will appear in the list above.
  3. Select one or more groups (using the checkbox) to which you would like to assign the mandate(s).
  4. Click on ‘Assign to selected group(s)’ to assign the mandates to the selected group(s)

Note: empty groups are automatically removed

Removing mandates from groups


  1. In ‘Manage mandates’ click on the tab Groups to display the groups and their containing mandates.
  2. Select the mandates you would like to remove from this group, using the checkbox in the first column.
  3. Click on the button ‘Remove mandate(s) from the group’.

Note: empty groups are automatically removed

Renaming groups

  1. Click in ‘Manage mandates’ on the tab Groups to display the groups and their containing mandates.
  2. Click on the current name of the group. As a result, the field will become editable. Change the current name into the new name and hit enter.
Setting the sequence from first to next

If a mandate with sequence First was successfully executed, it must be changed to sequence Next. It’s important to carefully manage this, to prevent that files are rejected by the bank.

In Isabel 6 you can easily change the sequence of all mandates from First to Next.

  1. Select the mandates of which you would like to change the sequence to Next.
    Tip: you can filter out mandates in the columns
  2. Click on ‘Change to Next sequence’.
  3. A confirmation will be displayed. Click Yes to confirm your action.
    Note: this option is only available if all the selected mandates have sequence First.
Edit your mandates (adding amendments)

A debtor might request a change in his mandate (adjust his account-number, name or address). These changes must be initiated by the debtor and it strongly recommended having this confirmed by signed letter or mail (to avoid confusion in the future).

The payment scheme (Core/B2B) and payment type (recurrent/one-off) are definitive upon creation of the mandate, and can not be changed by amendment.

  • If you made a mistake when entering the mandate, delete the mandate and enter it again.
  • If you have a agreed a new payment schedule or a new payment type with your customer, a new mandate is required.


When you’re editing your mandates, Isabel will automatically suggest to add an amendment.

  1. To edit your amendment go to ‘mandate management’ and open the mandate you want to update/modify
  2. Edit the value that you want to change
    Tip: We recommend to write in the Note the old value
  3. Click on Save. If an amendment is required, a pop-up will appear. It will give you the option to add an amendment.
    • No: no amendment is created (which is not recommended)
    • Yes: the amendment window will be displayed with the old and the new value

Note: your bank has to only be notified once about an amendment. If you create a SEPA direct debit that includes a mandate with an amendment the amendment will automatically be removed from the mandate (not from your newly SEPA direct debit). If you remove the created SEPA direct debit from your transactions before sending it to your bank or the bank rejects the SEPA direct debit, you will need to recreate the amendment. This is way it's recommended to add changed values in the field 'Note'.

Import and export your mandates

By exporting and importing your mandates you can migrate all your existing mandates to another user or view it using a spreadsheet application like Excel.

The upload or import of mandates uses a proprietary format specific to Isabel. The export and import feature of mandates is intended to transfer mandates between Isabel users. It is not possible to import mandates into Isabel from an accounting software package, nor the other way around.

Exporting your mandates
  1. To export your mandates, go to ‘mandate management’ and click on Download all mandates in the left menu

  2. To download your export, go to My Reports in the top menu
    The description of your file in My reports will be "Download of mandates"

Remarks:

  • The export might take a while, depending on the amount of available mandates.
  • The export will only remain in My reports for a limited amount of time. It is therefore advised to store it on your computer.
  • In case you assigned mandates to groups, the groups will not be exported.
Importing your mandates
  1. To import your mandates, go to ‘mandate management’ and click on Upload mandates in the left menu

  2. Use the Browse button to open the file you downloaded while Exporting your mandates
  3. Choose between the options

    • Keep your mandates and ignore the duplicated uploaded mandates
    • Overwrite your mandates with the uploaded mandates

Remark: If you downloaded the mandates on a Mac using Safari, the ZIP file was most likely automatically extracted. In order to be able to upload it again to Isabel, you must first recompress the mandates file. Right-click on the XML mandates file and select Compress from the menu, then upload the resulting ZIP file using the procedure outlined above.

Open your mandates in Excel

By opening your mandates in Excel you can perform various administrative tasks with your mandates.

  1. Create an export of your mandates and save it on your computer
  2. Open the ZIP file you downloaded from Isabel 6 and place the file "isabel_download_of_mandates[ID].xml" in another folder (to extract it from the ZIP file)
  3. Open your Spreadsheet application (e.g. Excel) and choose File > Open > Choose to view All files (*.*)

  4. Navigate and open the file "isabel_download_of_mandates[ID].xml"
  5. Two confirmation messages will appear, keep the default action and click OK to continue
  6. As a result, your mandates will be shown in Excel

Remark: you cannot perform updates in Excel and afterwards import it in Isabel 6

More information
  • Definitions:

    • SEPA Direct Debit (SDD): the European direct debit system, which replaces DOM80 (and for instance DOM2000). With European direct debit, you have a unique, secure and rapid system for paying your bills in euros in any SEPA country.
    •  
    • Creditor: A person to whom money is owed by a debtor; someone to whom an obligation exists - in the context of isabel6, this means you.

    • Debtor: A person who owes a creditor; someone who has the obligation to pay a debt.

    • DMF: Debtor-driven Mandate Flow in which the debtor bank is responsible for mandates.

    • CMF: Creditor-driven Mandate Flow in which the creditor bank is responsible for mandates.

    • CI: Creditor Identifier.

    • MRI: Mandate-Related Info or information that is related to the mandate.

  • Descriptions:

    • Features in SDD:

      • SDD features one-off direct debits, with a mandate that can only be used for one single collection.
      • With SDD, the creditor is responsible for the management of the mandates.

      • SDD features two schemes (the difference is related to legal protection and contractual obligations):

        • The Core (= B2C = Business to Customer) scheme
        • B2B (Business to Business) scheme.

      • SDD features a shift from a DMF to a CMF.
  • Core vs. B2B Direct Debit scheme:

Core DD scheme


B2B DD scheme

Creditor is responsible for mandate acquisition

=

Creditor is responsible for mandate acquisition

No validation of mandate by Banks


?


Debtor Bank validates the mandate

Creditor sends Direct Debit request to his/her bank with mandate reference

=

Creditor sends Direct Debit request to his/her bank with mandate reference

Debtor Bank executes Direct Debit


?


Debtor Bank verifies the mandate & executes Direct Debit

Debtor has 8 weeks to request refund (more possible)

?

Debtor has no possibility of requesting refund

Collection date = D+1

=

Collection date = D+1


  • Mandate flow:

    • The creditor sends the European mandate form to your debtor. The debtor sends the signed form back directly.

    • The creditor archives the received (paper) mandates and enters the mandate information into isabel6. Thereafter, the creditor can proceed to set up a collection in isabel6.


  • SDD flow:

    • In the event of a collection, the transaction information available is sent to the bank.

    • The MRI must also be sent to the bank:

      • A mandate reference that must be unique to the creditor identifier concerned
      • A notion of 'sequence of the collection'. When making the first collection on a new mandate (and in the case of some subsequent amendments) it must be submitted as sequence value First. After a successful collection, the sequence value in the mandate management must be changed to Next.
      • The date of signature of the mandate
      • The scheme: Core or B2B

      • Mandate type:

        • Recurring: collections may occur repeatedly.
        • One-time: only one collection may be made.

    • The role of the banks:

      • Implementing role:

        • The creditor's bank ensures that the collections are sent to the debtor's bank.
        • The debtor's bank debits the debtor's account and remits the amount to the creditor's bank.
        • The creditor's bank credits the creditor's account.

      • Registering role:

        • Registration of the scheme, sequence and type of collection.
        • Storage of the history of the collections by the debtor's bank (e.g. for the right to refund).
        • Storing the DOM80 information for migrated mandates.
        • The confirmation of the B2B mandates.

      • Controls:

        • Is there sufficient provision on the debtor's account?
        • Is the sequence of collections respected?
        • Has the debtor blocked collections for this creditor?
        • Control of B2B mandates (no right to refund to the debtor).
        • If the claim cannot be debited from the debtor's account, the bank will report this as REJECT to the creditor's bank.


Creating and managing mandates
43590
16/09/2022